2013年7月25日星期四

Tips for choosing the best sports bra

Get The Right
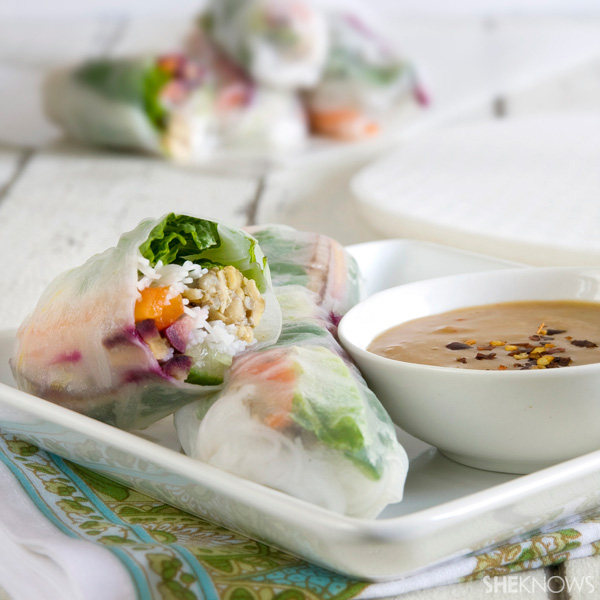
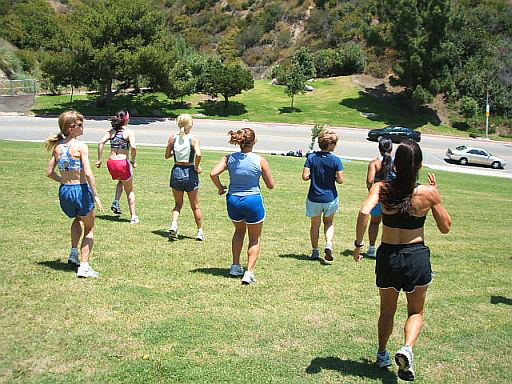
Sports Bra FitYou relish your weekly six-mile runs, kick boxing classes, and outdoor bootcamp regime. However, your breasts are getting a serious beating, leaving you in pain and at risk of breast line sag. What's the deal? Fitness trainer and spokesperson for the American Council on Exercise (ACE) Sabrena Merrill, MS says your sports bra is likely to blame. Here are Merrill's tips for choosing the best sports bra and avoiding exercise-induced boob droop.

Woman wearing pink sports bra

Women need sports bra support

The importance of choosing the right sports bra is beyond the trendy fashion statement it may make as you sweat. Sports bras are designed to provide extra support to keep your mind focused on your workouts while preventing damage to your breast tissue as you are jumping, jogging, punching and kicking.

"Prevention of breast pain and breast sag are the main health reasons for wearing a sports bra during exercise," explains Merrill, a 20-year veteran of the fitness industry. "It has been reported that 56 to 72 percent of physically active women experience exercise-related breast pain during and after workouts. The repeated stress of breast movement during exercise can damage the ligaments and other supporting structures of the breast, thus causing increased sag."

Don't don your regular bra

You may love the fit and feel of your regular bras, but they won't give you the support your breasts need during a vigorous workout. "Sports bras are designed to minimize breast movement and provide extra support, whereas regular bras are typically designed for basic support and style," says Merrill. "Also, many sports bras come in soft, moisture-wicking fabrics, which offer additional comfort."

Know your size

Sports bras come in two different designs: compression and encapsulation. The size of your breasts will determine which sports bra design is right for you. "Smaller-cup-sized women should look for compression sports bras, which flatten the breasts to the chest wall," advises Merrill. "Women with larger cups sizes should choose encapsulation sports bras, which contain molded cups that encapsulate each breast separately and allow independent movement of each breast."

Try before you buy

As tempting as it is to grab and go, take your sports bra to the dressing room and try it on. More important, give it a quick test run. "Jump up and down a few times in the dressing and make note of the movement of the breasts and any chaffing from the bra," stresses Merrill. "A small amount of breast movement is normal, but a woman should feel supported while jumping." Don't buy a sports bra that doesn't feel right -- give a few others a try to find the best one.

Seek expert advice

Consider talking to an expert if you are buying your sports bra in a fitness store -- she can help you decide which style, material and price range fits your exercise and budget needs.

Once you find the perfect sports bra, buy a few extra and keep one in your sports bag or gym locker at all times. Look at wearing a sports bra as part of your health and fitness routine. Not only will you be able to work out harder and more mindfully, you'll also be protecting your breast tissue from damage and sag.

More fitness apparel and fitness accessory tips How to find the perfect running shoe Four must-have yoga accessories 5 Gym bags under $50 Eco-friendly workout wear Winter fitness footwear

2013年7月24日星期三

Remembering Pan Am flight food

When Airline Dining Was Five-Star DiningThe new drama series, Pan Am, premieres Sunday on ABC, and while those elegant dinners and classic cocktails seem like pure fiction today, there was a time not so long ago when you could fly with an ice cold martini and a nice cut of prime rib.

Christina Ricci Pan Am

With the premiere of ABC's new series, Pan Am, audience members can harken back to a day when men wore hats and women wore gloves wherever they went. Remember when people got dressed up just to board an airplane and when the seats were sectioned into smoking and non-smoking? Yes, there was a time when the meals were equal to a fine dining experience. Since it has been several years since domestic flights even served meals, we asked Anke Bode, a stewardess with the classic airline from 1967 - 1986, if the rumors were really true or complete fiction. She said yes -- all those ice cold cocktails and delicious looking entrées were in fact standard on any and all Pan Am flights, especially those that traveled around the world.

Five star first class

While meals were served in all three sections of the airplane, first class was the place to be. "It was very elegant", Bode says. So elegant in fact that they not only had a caviar cart, but they also had prime rib which was made to order. Bode says they received requests all over the spectrum from rare to well done, but those who requested their prime rib well done "usually got an end piece." If you didn't like prime rib, though, you needn't worry. There were plenty of other options to choose from including lobster thermador, a cascade of shrimp, lamb curry and stuffed duck.

Like all fine dining establishments, desserts were on the menu. Passengers flying from Los Angeles to Hawaii were served macadamia nut ice cream, and for passengers flying to London, cherries jubilee was the dessert du jour. While cherries jubilee is known for its fiery spectacle, that was the one thing missing on board each flight the dessert was served. According to Bode, "there was definitely brandy, but no flambé" -- for safety of course.

Booze on board

With every great meal comes a great glass of wine or cocktail and Pan Am was ready to pour a glass. Just like today, the cocktails were served before the food carts made their way down those little aisles. Also similar to today, a little snack came with them. But, believe it or not, Pan Am never served peanuts on their flights. According to Bode, Pan Am only served almonds.

While all of these delectable options were available to the passengers in first class, the menu wasn't nearly as extensive in business or economy class, and nothing was made to order. For the less expensive sections, the stewardesses would walk down the aisle with the food cart and ask the passengers if they wanted chicken or beef. These meals were pre-cooked by a catering service at the airport and then re-warmed on the plane. Even though the chicken and beef were pre-cooked ahead of time, the quality was still quite high.

Girdles and weigh ins

With dishes like these, one can't help but wonder how the stewardesses kept their figures. In the ABC series, the stewardesses go through a weight check which Bode says was absolutely true. "It was really unfair," she says. The airline based the stewardesses' weight on a graph, so "if you were this tall then this is the weight," she explains. If they were over that weight, they were put on notice. Since the weight checks were random, Bode says the stewardesses were never grounded for being overweight, but they did need to lose the pounds by a certain date. "If you didn't comply, they took you off the schedule." And those girdles that were so popular back then? Bode admitted that "we were supposed to wear them all the time, but (after flight school) no one did."

So when you sit down to watch ABC's new series about Pan Am, why not whip up a little treat that they served on the planes back in 1963? Celebrate the premiere of this new drama with cherries jubilee, and since you'll be in the comfort of your own home, flambé away.

Cherries jubileeIngredients:1 can pitted Bing cherries1/4 cup sugar1 tablespoon corn starch1 tablespoon fresh lemon juice1 tablespoon butter1/3 cup brandyVanilla ice creamDirections:
    Drain cherries and save the liquid.In a medium sauce pan, mix together the sugar and corn starch. Gradually mix in the cherry liquid and bring to a boil over medium heat, stirring constantly. Reduce the heat to low and simmer for three minutes, stirring occasionally.Stir in the lemon juice, cherries and butter and continue to simmer for another three minutes.While the cherry mixture simmers, warm the brandy in a small sauce pan.Transfer the cherry mixture to a chafing dish. Scoop vanilla ice cream into a bowl. Pour the warmed brandy over the cherries and light with a match. Ladle flaming cherries over ice cream and serve immediately.
For more feature interviews with real Pan Am stewardesses, click here >>

2013年7月22日星期一

Tempeh Thai spring rolls with peanut sauce recipe

Beat The Heat
With This Thai TreatWith the mercury rising, keep your kitchen cool with these refreshing Thai spring rolls. Take advantage of summer's best produce with this simple, healthy and delicious recipe.

Thai spring rolls with spicy peanut sauce

Thai spring rolls with spicy peanut sauce

Serves 4

Give your oven a break this summer with these Thai spring rolls. Refreshing and delicious, they're sure to be a hit with the whole family.

Ingredients:1 (8 ounce) package tempeh, sliced into 8 long strips2 garlic cloves, minced2 tablespoons sesame oil, divided1 drop chili oil (optional)1/4 teaspoon sriracha2 ounces vermicelli rice noodles1/2 cucumber, sliced into long thin strips1 cup romaine lettuce1/2 cup fresh basil1 large carrot (or 4 baby carrots), sliced into long thin strips1/2 red bell pepper, sliced into long thin strips1 teaspoon rice vinegar8 rice papersWater Directions:1Step 1

In a small bowl, combine minced garlic, one tablespoon of sesame oil, chili oil and sriracha. Stir to combine. Coat the tempeh strips with the sauce and marinate it in the refrigerator for 30 minutes. In the meantime, wash and slice the vegetables and drizzle with rice vinegar.

2Step 2

Bring a pot of water to a boil and add vermicelli noodles. Remove from heat and soak for eight minutes. Strain and set aside.

3Step 3

When the tempeh is finished marinating, heat remaining tablespoon of sesame oil in a large skillet over medium heat. Add tempeh strips and cook for three minutes without moving. Turn and cook the other side for another three minutes without disturbing. Remove from heat.

4Step 4

Fill a shallow bowl with lukewarm water. Place one rice paper in the bowl and soak for 30 to 60 seconds. Carefully transfer the rice paper to a cutting board or large plate.

Step 4

5Step 5

Top the rice paper with a few pieces of lettuce and basil.

6Step 6

Add a few strips of carrots (purple heirloom carrots are used in the image, but any carrot will work fine).

Step 6

7Step 7

Top with a few strips of cucumber.

Step 7

8Step 8

Add a few strips of red bell pepper.

Step 8

9Step 9

Top the vegetables with one piece of cooked tempeh.

Step 0

10Step 10

Top the tempeh with some cooked vermicelli rice noodles.

Step 10

11Step 11

Carefully lift the sides of the rice paper and fold it over the ends. Rice paper is very delicate and may stick to your plate. Moving slowly will help with the rolling process.

Step 11

12Step 12

Lift the top of the rice paper and roll it over the filling, tucking in the sides as you go. Roll as tightly as possible without ripping the paper.

Step 12

13Step 13

Repeat steps four through 12 until you have eight spring rolls. Refrigerate until cold.

Step 13

Spicy peanut sauce

Serves 4

Ingredients:2 tablespoons natural peanut butter2 tablespoons coconut milk1 tablespoon sesame oil1 tablespoon soy sauce1/4 teaspoon chili flakes1 drop chili oilDirections:
    In a small bowl combine peanut butter, coconut milk, sesame oil, soy sauce, chili oil and chili flakes. Whisk until smooth and fully combined. Store in the refrigerator until ready to serve.Serve spring rolls cold with spicy peanut sauce.
More Thai recipes

Chicken and sprimp pad Thai
3-Step Thai sweet potato salad
Thai peanut and popcorn crusted chicken

2013年7月21日星期日

Celebrate National Sandwich Day with free food!

Free Sandwiches Nationwide!National Sandwich Day is Nov. 3! Celebrate this special day with free food available at select restaurants nationwide.

National Sandwich Day is Nov. 3

It's finally here.

Tomorrow, Nov. 3, is the day we celebrate the world's most perfect food creation: the sandwich.

You thought it was National Chocolate Day, right? Nope, that was last week.

Meaty history

National Sandwich Day falls every year on Nov. 3 which, coincidently, is the birthday of the most important figure in history: sandwich inventor John Montagu, better known as the Earl of Sandwich.

The legend says that the 18th century nobleman wanted to eat his meal with one hand while gambling, so he instructed his minions to put the meat before two slices of bread. He loved his creation and the sandwich was born.

Celebrate sandwiches

National Sandwich Day is the perfect time to celebrate this innovation with -- what else? -- a sandwich! Several restaurants are getting in on the celebration by offering free or inexpensive sandwiches. Check out a few of the deals.

Noodles & Company -- Certain Noodles & Company locations are offering free sandwiches in honor of the day. Check out all the details on their Facebook page.

Arby's -- Select Arby's restaurants in Richmond, Va. are offering a free order of curly fries with purchase of a sandwich. Check out their website for details.

R.J. Grunts -- This Chicago restaurant is offering a unique way to earn free food. A Blackjack dealer will roam the tables at the restaurant and invite patrons to play. The player at each table with the winning hand gets his sandwich on the house.

NY54 Pizza -- This Chandler, Ariz. Restaurant is offering 35 percent off sandwiches.

Know of any more deals in honor of National Sandwich Day? Share the wealth and let us know!Scrumptious sandwich recipes

Homemade McRib recipe
Grown up gourmet cheese sandwich recipes
Reuben sandwich recipes

2013年7月18日星期四

How to read turkey labels

How To Read
Turkey Labels During the next couple of weeks, we’ll be heading to the store to pick out the perfect centerpiece for Thanksgiving dinner—the turkey. What seems like a pretty straightforward task can become overwhelming when you begin comparing labels on the birds: natural vs. organic or fresh vs. frozen.

whole raw turkey

These phrases aren't haphazard, the United States Department of Agriculture (USDA) has set definitions and standards for certain words that appear on poultry labels. Before you head to the supermarket, make sure you know the meaning of these 10 turkey terms, defined by the USDA.

Basted (or self-basted)

The turkey has been injected with, or marinated in, ingredients meant to enhance the flavor including butter, broth, stock, spices, and more.

Free-range (or free-roaming)

These birds were allowed access to the outdoors for at least half of their lives. Poultry producers have to prove this to the USDA before they're allowed to add this phrase to their labels.

Fresh

The turkey was quickly chilled after processing, but not frozen. It should be pliable to the touch, not rock solid. In technical terms, it has been kept above 26 degrees Fahrenheit. When you buy a fresh turkey, keep it in a refrigerator that is set to 40 degrees Fahrenheit or below and use it within one to two days.

Frozen

The turkey was flash frozen after processing to bring it to a safe temperature, then stored at 0 degrees Fahrenheit or below. Store it in the freezer.

Hen and Tom

A female and male turkey, respectively.

Minimal processing

The turkey wasn't altered much from its raw state while getting ready for the supermarket.

Natural (or all natural)

Birds with no artificial flavors, colors, chemical preservatives, or any other artificial or synthetic ingredients; it also has been minimally processed.

No hormones added

Hormones aren't allowed when raising poultry, so this label is irrelevant.

Organic

The turkey has met organic standards set by the National Organic Program (among them, no genetic engineering). For a bird to earn an organic label, the farmer and the companies that handle and process it must be certified organic.

More Thanksgiving Turkey facts

Safety tips for turkey fryers

Thanksgiving kitchen safety

Traveling safely with a turkey dinner


2013年7月17日星期三

Backward running Why you should be doing it

Woman at track

You've heard the phrase about women running backwards in high heels, right? Minus the heels perhaps, running in reverse isn't a joke after all.

Turn your back
on running

Backward running is not only a fun way to burn calories, it also offers strength and posture benefits that regular running doesn’t.

If you’ve seen those “crazy” people running backward at the track or on the treadmill at the gym, you may be wondering if it’s some newfangled way to work out. Believe it or not, reverse running is not new. It surfaced as an activity in its own right almost 40 years ago, when sports doctors began recommending the method to rehabilitate injured athletes.

Run backwards for efficient fitness"Running in reverse motion is said to make you fitter (and faster) than running forward."

According to Dr. Barry Bates, professor emeritus at the University of Oregon, backwards running is a more efficient way of moving compared with runners who run forward. The human performance expert has conducted research on backwards running that indicates that reverse runners need to move at only 80 percent of the speed of those who run in the conventional direction to get the same fitness benefits. A pioneer in the field of biomechanics and neuromuscular development, Dr. Bates says he stumbled upon retro running in Runner's World, which reported that many athletes use backward running to recover from injuries. "Athletes have used it as part of their training for years, but not as an exclusive activity. It is often used in combination with forward walking/running to create a better-balanced body," he says. Reverse running decreases the impact on your joints. So it's not surprising that it's often recommended for knee and back problems.

And there are hidden advantages to this novel approach. Running in reverse motion is said to make you fitter (and faster) than running forward. Another backward-running expert, James Bamber, says reverse running benefits include strengthening your foot muscles and improving your posture.

In addition, the very nature of the backward movement targets your posterior muscles. Running in reverse is a great way to tone and strengthen your calves, hamstrings, glutes and back.

How to get started with reverse runningOn the treadmill

Ready to get running in reverse? The best way to incorporate backward running into your workout program is by first walking backward. Janet S. Dufek, PhD, an associate professor at the University of Nevada Las Vegas, recommends reverse walking on a treadmill, where you can use the rails for support. “Try walking forward for five minutes and backward for two minutes, then repeat the pattern throughout your workout.”

As you get more comfortable with the movement, you can increase your speed from walking to running. Be warned that walking in reverse is much harder, so slow your pace by at least 50 percent. When increasing your backward running speed, increase your stride length before increasing your stride frequency.

On the track

If you want to become a reverse running enthusiast, experts like Garret Doherty advise practicing every day. Doherty suggests starting out walking or running short distances backward, switching to running forward and repeating for as long as you need until you're comfortable.

On the field, Doherty recommends that you run 50 meters backward and then do 50 meters forward. Repeat. You can increase this distance as you feel more confident.

Are there any downsides to reverse running?

Reverse running class

Other than the obvious fact that you can't see where you're going, there may be a bit of pain in the neck if you strain to look over your shoulder. "Safety is a critical issue with this sport,” Dr. Bates warns. “Find a good hard surface that you don't have to worry about and where you don't want to have to keep turning your head.”

He also advises running with a partner if you want to run in a public place such as a park. Hold hands and take turns, with one of you running/looking forward and the other running in reverse.

No matter which technique you use to practice running in reverse, you'll achieve your fitness goals faster. Bates says that physiologically, the demands of running 4 miles an hour backward are the same as running 5 miles per hour moving forward! So backward is onward and advancing.

More running tips

20-Minute treadmill workout
A beginner runner's guide
Best apps for the iPhone: Apps for runners

2013年7月16日星期二

Sunday Dinner Acorn squash with wild rice

Wonderful
Winter Squash!Try a simple, seasonal Sunday dinner dish that has great flavor and visual appeal. Acorn squash with wild rice is an easy dish to pull together for a seasonal treat!

Acorn Squash with Wild Rice

Go with food that's in season! It has the best flavor and might also give you a chance to try new recipes. Acorn squash offers the perfect opportunity to try a winter weather vegetable. It's easy to make, and that's just one reason to try it for Sunday dinner. You'll love the presentation of this dish, too!

Acorn squash with wild rice recipe

Serves 4

Ingredients:2 acorn squash, washed2 cups cooked wild rice2 cloves garlic, minced1 shallot, minced1/2 cup dried cranberries1/2 cup toasted walnuts, chopped1/2 teaspoon dried sage2 tablespoons olive oil, divided1/4 teaspoon salt, plus 1/4 teaspoon for seasoning squash1/4 teaspoon ground black pepper, plus 1/4 teaspoon for seasoning squashDirections:
    Preheat your oven to 450 degrees F.Sliced squash in half, lengthwise. Scoop out the seeds and stringy pulp and discard.Drizzle the insides of the squash with 1 tablespoon olive oil and season with 1/4 teaspoon salt and 1/4 teaspoon pepper.Place squash on a baking sheet, cut side down, and bake for about 30-40 minutes or until soft when pierced with a fork.Meanwhile, cook your wild rice, then set aside.In a large saute pan, heat 1 tablespoon olive oil over medium heat. When hot, add the shallot and garlic, salt, pepper and sage, and mix well.Add the rice to the shallot mixture, just to heat it through, along with the walnuts and cranberries. Mix well and remove from the heat.When the squash are finished baking, place on a platter, cut side up, and fill each half with the rice mixture. You will have some extra rice to serve on the side.Serve warm.

Seasonal winter veggies make great meals!

More Sunday Dinner recipes

Pasta with Brussels sprouts
Pastina with vegetables
Sweet potato rosemary biscuits

2013年7月15日星期一

Black Swan cocktail

Black Swan
Tequila Cocktail Unless you live under a rock, you've heard about Natalie Portman and Mila Kunis' tequila-induced sex scene in Black Swan. In that spirit we present this Black Swan cocktail from Dobel Tequila.

Black Swan Cocktail

This Twisted Swan cocktail inspired by Black Swan is one part sinsiter, one part sexy--just like the movie itself.

Twisted Swan Cocktail

Ingredients:

1 1/2 ounces Black Raspberry Liqueur1 ounce DOBEL Tequila1/2 ounce amaretto liqueur

Directions:

    Shake tequila and amaretto with ice.Strain into chocolate rimmed martini glassShake black raspberry liqueur with ice and layer into martini glass
More Cocktail Recipes From SheKnows

Mezcal Cocktails

Cocktails inspired by the Sexiest Men Alive

SheKnows Signature Cocktails

相关的主题文章:

2013年7月13日星期六

Slow cooker sandwiches Barbecued shredded chicken sandwiches

Sink Into Sandwiches!Whether you're short on time or you just use yours wisely, slow cooker recipes are so convenient. This recipe for barbecued shredded chicken sandwiches makes a great meal, perfect for an end-of-summer picnic or for fall football tailgate parties!

Slow cooking bbq chicken sandwiches

Grab one of these sandwiches

It doesn't take much effort to pull together these tasty, slow cooker barbecued shredded chicken sandwiches. Toss together some cole slaw, grab some tortilla chips and a dip, and you've got a super-simple (and satisfying) meal. Make this meal for a Saturday picnic in the summer or for a party with friends during football season. What a way to get it together!

Check out this recipe for famous cole slaw >>Barbecued shredded chicken sandwiches

Serves 8

Ingredients:2-1/2 pounds boneless, skinless chicken breasts1/2 cup water1/2 cup ketchup1/2 packed brown sugar1/3 cup cider vinegar1/4 teaspoon hot sauce1 teaspoon celery seed1 teaspoon salt8 sandwich buns1-2 pints cole slawDirections:
    Place the chicken in the slow cooker with the one-half cup of water.Whisk together the ketchup, brown sugar, vinegar, hot sauce, celery seed and salt until smooth, then pour it over the chicken.Cook for about four hours on high heat.Take out the chicken, shred it with a fork and knife, return it to the slow cooker and mix it up a bit with the sauce.Keep it warm until you're ready to serve on buns topped with your favorite cole slaw.

These sandwiches are great anytime of year!

More slow cooker recipes to try

Slow cooker African peanut stew
Slow cooker spicy Cajun gumbo
Crock pot chicken and dumplings

相关的主题文章:

2013年7月10日星期三

Pumpkin spice granola and yogurt parfaits

Pumpkin For BreakfastIt's pumpkin time! Get your fill of this orange squash this fall by eating it for breakfast, too. These pumpkin spice granola and yogurt parfaits are so good they could even double as dessert!

pumpkin granola yogurt parfait

Pumpkin recipes are popping up everywhere you look, from lattes to soup to cheesecake. If you find yourself wanting even more, make a pumpkin-infused breakfast. From the granola to the yogurt, each component of this autumn treat incorporates our favorite seasonal squash.

Pumpkin spice granola

Makes about 6 cups

Ingredients:3/4 cup pumpkin puree1/2 cup brown sugar1/4 maple syrup1/2 teaspoon salt1/2 teaspoon cinnamon1/2 teaspoon pumpkin pie spice3 cups old-fashioned oats1 cup roasted pepitas or pumpkin seeds (or combination)1 cup pecans, roughly chopped1/2 cup sliced almondsDirections:
    Preheat oven to 325 degrees F. Line a baking sheet with parchment paper.In a large bowl, combine pumpkin puree, brown sugar, syrup, salt, cinnamon and pumpkin spice. Whisk to combine.Add oats, pepitas, pumpkin seeds, pecans and almonds to pumpkin puree mixture. Stir well to coat.Spread mixture on baking sheet and bake for 20 minutes. Remove from oven, stir granola and return to oven for 20-30 more minutes, until mixture is dried out.Remove from oven and let cool completely. (Granola will crisp as it cools.)Store in an airtight container at room temperature.Serve granola layered with pumpkin yogurt. (See recipe below.)
Pumpkin spice yogurt

Makes about 1/2 cup

Ingredients:1/2 cup plain Greek yogurt2 tablespoons pumpkin puree2 teaspoons honey or maple syrup1/4 teaspoon pumpkin pie spice1/4 teaspoon cinnamonDirections:
    Whisk all ingredients together.Top yogurt with pumpkin spice granola or layer granola and yogurt for parfaits.
More pumpkin recipes

3 Non-pie pumpkin desserts
Baked pumpkin mac and cheese
Pumpkin cheesecake

2013年7月4日星期四

3 Boozy cranberry sorbets

Move Over,
Cranberry SauceCanned cranberry sauce is not the only way to satisfy your cranberry cravings at this time of year. Not only do these seasonal sorbets use fresh cranberries, they're also spiked!

Boozy cranberry sorbet

You don't need to wait for the turkey and mashed potatoes to get your fill of cranberries. Instead, eat them in dessert form with one of these boozy cranberry sorbet recipes. It's the perfectly refreshing way to end a meal.

Vodka-cran sorbet with a twist

This frozen twist on the classic vodka-cranberry cocktail is refreshingly tart.

Makes about 2-1/2 cups

Ingredients:8 ounces fresh cranberries1-1/2 cups water1-1/3 cups sugar2 tablespoons vodka2 tablespoons lime juice1/4 teaspoon lime zestDirections:
    Rinse cranberries. Put in a saucepan and add sugar and water.Bring to a simmer over medium heat. Simmer for about 10 minutes, stirring occasionally, until cranberries are mostly popped and tender. (Watch pot carefully as the mixture tends to boil over easily.)Let cool for a few minutes, then transfer mixture to a blender. Blend until completely smooth, then pour through a sieve to strain. Discard solids.Mix strained cranberry mixture with vodka, lime juice and zest. Refrigerate until chilled.When chilled, stir cranberry mixture well, then pour into an ice cream maker. Run ice cream maker for about 45 minutes (or according to manufacturer's directions) until sorbet is frozen.Transfer sorbet to the freezer to finish setting up overnight.
Cooking tip

If your sorbet mixture is too tart, blend in sugar, to taste, while the mixture is still warm. Blend well until sugar is completely dissolved.

Sparkling cranberry-vanilla sorbet

Sparkling wine makes anything better, including this unique combination of tangy cranberry and intense vanilla bean.

Makes about 2-1/2 cups

Ingredients:8 ounces fresh cranberries1-1/2 cups water1-1/3 cups sugar1/2 a vanilla bean1/4 cup sparkling wineDirections:
    Rinse cranberries. Put in a saucepan and add sugar and water.Split vanilla bean down the middle and scrape out seeds. Add seeds and pod to saucepan.Bring to a simmer over medium heat. Simmer for about 10 minutes, stirring occasionally, until cranberries are mostly popped and tender. (Watch pot carefully as the mixture tends to boil over easily.)Let cool for a few minutes, remove vanilla bean pod, then transfer mixture to a blender. Blend until completely smooth, then pour through a sieve to strain. Discard solids.Mix strained cranberry mixture with sparkling wine. Refrigerate until chilled.When chilled, stir cranberry mixture well, then pour into an ice cream maker. Run ice cream maker for about 45 minutes (or according to manufacturer's directions) until sorbet is frozen.Transfer sorbet to the freezer to finish setting up overnight.
Safety tip

Be extremely careful when blending hot mixtures. Do not fill your blender too full and make sure to hold the lid on tight to prevent explosions.

Cran-raspberry sorbet

Fall fruit flavors make this sorbet sing!

Makes about 4 cups

Ingredients:8 ounces fresh cranberries6 ounces raspberries1-1/2 cups water1-1/3 cups sugar2 tablespoons raspberry vodka1/2 cup tangerine (or orange) juice1/4 teaspoon tangerine (or orange) zestDirections:
    Rinse cranberries. Put in a saucepan with raspberries and add sugar and water.Bring to a simmer over medium heat. Simmer for about 10 minutes, stirring occasionally, until cranberries are mostly popped and tender. (Watch pot carefully as the mixture tends to boil over easily.)Let cool for a few minutes, then transfer mixture to a blender. Blend until completely smooth, then pour through a sieve to strain. Discard solids.Mix strained cranberry mixture with vodka, tangerine juice and zest. Refrigerate until chilled.When chilled, stir cranberry mixture well, then pour into an ice cream maker. Run ice cream maker for about 45 minutes (or according to manufacturer's directions) until sorbet is frozen.Transfer sorbet to the freezer to finish setting up overnight.Cooking tip: If your sorbet mixture is too tart, blend in sugar, to taste, while the mixture is still warm. Blend well until sugar is completely dissolved.Safety tip: Be extremely careful when blending hot mixtures. Do not fill your blender too full and make sure to hold the lid on tight to prevent explosions.
More cranberry recipes

Cranberry salad
Spiked cranberry tea
Pumpkin cranberry bread

2013年7月2日星期二

DIY watermelon cocktail keg

A Fun Way To Serve Grown-Up DrinksTurn a basic watermelon into a super-cool melon cocktail keg by carving it out and adding a tapper. This is a simple, fun and creative way to serve all of your summer drinks.

Want a super-cool way to serve up drinks at your next summer get-together? With a few simple tools, you can use this step-by-step guide to transform that boring melon into a super-cool drink dispenser! Add the watermelon punch spiked with Seagrams Brazilian rum and wow everyone by serving it up in your very own melon cocktail keg!

What you need:1 large watermelonA sharp knifeA large spoonA large bowlA pen or markerPower drill with a 3/4-inch drill bit1 beer shank kit Directions:1Step one

Look at the watermelon and determine which side is the best to place the faucet. If your watermelon is a bit unsteady when standing it up, cut off just a small portion of the bottom to help it stay balanced. With the knife, cut a circle on the top to form a "lid" with the same method as if you were going to carve a pumpkin for Halloween. Remove the "lid" from the watermelon and set aside as you will use this later.

2Step two

With the large spoon begin to scoop out all of the watermelon and its juice and place it all into the large bowl. (Be careful to only scoop out the fruit and not the rind.)

3Step three

With the pen, mark the area you want to drill the hole for the faucet. With the power drill very gently and slowly start to drill the hole into the base of the melon.

4Step four

Carefully insert the long neck of the shank into the melon. Do not try to jam the shank into the melon as this can lead to breaking or cracking. If you need to widen the hole slightly, use the tip of a sharp knife. The shank needs to fit very snuggly in order to not leak.

5Step five

Once the shank is in place, slide the O-ring on along with the adapter. Make sure that everything is tight and check for any leaks. Once you confirm that it is in working condition, add the beverage to the melon. Top with the "lid" and serve your drink!

Spiked watermelon punch recipe

Serves 12 to 15

Ingredients:1 whole watermelon, pureed3 cups coconut rum1/2 cup watermelon schnapps, or any flavor1-1/2 cups pineapple juice1-1/2 cups peach, guava or strawberry nectar12 cups crushed IceLime wedges for garnishDirections:
    In a large bowl add the watermelon puree, the liquors, pineapple juice and the fruit nectar, mixing very well.Add the mixture to the watermelon "keg," adding the ice and then the "lid" of the melon.Add a lime wedge to each glass and serve the drink icy cold.
More watermelon ideas

How to carve a watermelon whale
Russian watermelon cocktail
Watermelon granita